wordpress · · 5 min read
Configuring WordPress to Use SMTP for Sending Emails
A guide on how to configure WordPress to use SMTP for sending emails.
By default, WordPress uses the PHP Mail function to send emails. However, it’s better to use SMTP because it can handle sending messages more efficiently, and you can also use it to send emails from third-party email services. You can also refer to this video for further guidance.
Steps to Configure SMTP in WordPress
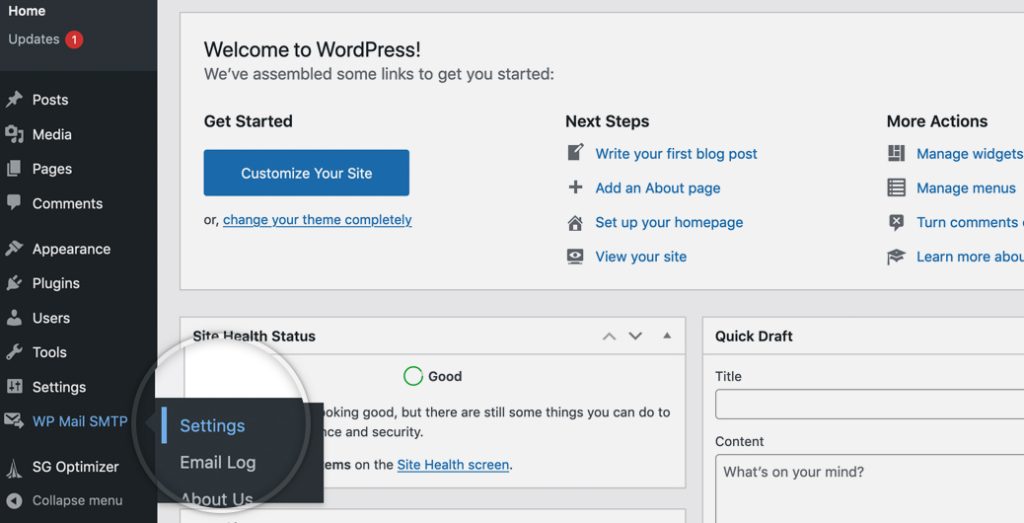
First, follow the instructions in our WordPress plugin installation tutorial to install a plugin called WP Mail SMTP. Once you install and activate the plugin, a new menu called WP Mail SMTP will appear. You’ll need to navigate to that menu to configure WordPress to work with SMTP.
On this page, you’ll see several configuration options available:
Here’s a list of all the configuration options and what they’re for:
From Email - The email address you want to send emails from.
For example, [email protected]; From Name - The name you want the emails to be sent from;
Mailer - Choose whether you want to use the default PHP mail() function, a Gmail/Google Workspace account, Mailgun, SendGrid, or another SMTP server. Selecting the Default option will send messages using the PHP mail() function without requiring SMTP authentication.
The Gmail/Google Workspace, Mailgun, and SendGrid options require additional information, such as Client ID and Client Secret or the respective provider’s API key. The Other SMTP Server option will prompt you to enter further configuration details, which we’ll describe below.
Force From Email - Check this option if you want the return path for your emails to match the email address you’re sending from; If you choose Other SMTP Server as the Mailer, you’ll be prompted to add the configuration settings for your SMTP server.
- SMTP Host - The IP address or hostname of your SMTP server. You can find your SiteGround website’s server hostname in Site Tools -> Email -> Accounts -> kebab menu -> Mail Configuration -> Manual Settings tab;
- SMTP Port - The port number of your server;
- Encryption - If the hostname supports SSL/TLS encryption, select it here;
- Auto TLS - Enable this if your server supports TLS encryption;
- Authentication - Check if your SMTP server requires authentication;
- Username - The email address you want to send emails from, e.g., [email protected];
- Password - Enter the password for the email address set in the Username field; After configuring these parameters, click the “Save Settings” button at the bottom of the page.
Configuring WordPress to Use SiteGround Email for Sending Emails
After installing WP Mail SMTP, navigate to WP Mail SMTP -> Settings in the WordPress wp-admin panel. Select Other SMTP as the Mailer setting, and a new section will open below. In this new section, fill in the following information:
- SMTP Host - You can find your SiteGround website’s server hostname in Site Tools -> Email -> Accounts -> kebab menu -> Mail Configuration -> Manual Settings tab -> Outgoing server;
- Encryption - TLS;
- SMTP Port - 587;
- Authentication - Enabled;
- SMTP Username - The email address you want to send emails from, e.g., [email protected];
- Password - Enter the password for the email address set in the SMTP Username field; Then click the “Save Settings” button to apply the changes.
After changing the settings, always test the functionality of the email sending service. To do this, go to your WordPress admin panel -> WP Mail SMTP -> Tools -> Email Test, and send a test message to your email address. If you don’t receive the test message, you’ll need to verify the configuration settings you applied and ensure they’re correct.
Configuring WordPress to Use Google/Gmail for Sending Emails
After installing WP Mail SMTP, navigate to WP Mail SMTP -> Settings in the WordPress wp-admin panel. Select Google / Gmail, and you’ll see that you need a Client ID, Client Secret, and an Authorized Redirect URI.
To create these, go to the Google Cloud Console dashboard, click “My Projects” at the top of the page, and then select “New Project”. After giving the project a name, you’ll be prompted to create credentials. You’ll need to select “Web Application” as the application type and provide an Authorized Redirect URI (you can use the default value provided by the plugin).
After creating the credentials, you’ll be provided with a Client ID and Client Secret that you can copy and paste into the respective fields in the WP Mail SMTP plugin settings.
To configure WordPress to use SMTP for sending emails, you can follow these steps:
- Install the plugin: In the WordPress backend, go to “Plugins” > “Add New”, and search for and install the plugin called “WP Mail SMTP”. Once installed, activate the plugin.
- Configure the plugin: In the WordPress backend, go to “Settings” > “WP Mail SMTP” to configure the plugin.
- Select the mailer: In the “Mailer” section, select “Other SMTP”.
- Configure the SMTP server: Based on the information provided by your SMTP server, fill in the following fields: - SMTP Host: The hostname or IP address of your SMTP server. - SMTP Port: The port number of the SMTP server. Common ports are 25, 465 (for SSL encryption), or 587 (for TLS encryption). - Encryption: Select the appropriate encryption option, depending on whether your SMTP server requires an encrypted connection. - Authentication: Check this option if the SMTP server requires authentication. - Username: Your username for the SMTP server. - Password: Your password for the SMTP server.
By following the steps above and configuring the SMTP settings, your WordPress site should be able to send emails using SMTP. Make sure the SMTP server details you provide are accurate and configured correctly according to your requirements.
Mttao GitHub ↗
Exploring technology and life's wisdom