N8N · · 5 min read
Free Cloud Deployment of n8n: Complete Guide
Zero-cost deployment of n8n workflow automation platform: Build your personal automation hub using Hugging Face Spaces and Supabase. Includes detailed steps, configuration guide, and troubleshooting methods.

Want to build a workflow automation platform that’s completely yours? This guide will walk you through how to deploy n8n in the cloud at zero cost, combining the powerful computing capabilities of Hugging Face Spaces with the reliable database services of Supabase to create a complete AI automation workflow tool.
🎯 Why Choose This Solution?
Technical Architecture Advantages
The n8n + Hugging Face Spaces + Supabase combination offers the following outstanding advantages:
- 💰 Zero-cost startup: Both Hugging Face and Supabase provide generous free tiers
- 🔒 Full control: Self-hosted n8n solution with complete data ownership
- ⚡ High availability: Backed by enterprise-grade infrastructure
- 📈 Easy scaling: Smooth upgrades when demand grows
Use Cases
- Personal automation needs (email processing, data synchronization)
- Small team collaboration tool integration
- AI workflow experimentation and prototyping
- Learning and testing automation technologies
📋 Core Components Introduction
n8n: Open-Source Workflow Automation Platform
n8n is a powerful visual workflow editor that supports:
- 400+ pre-built nodes: Covering mainstream applications and services
- Visual editing: Drag-and-drop workflow design
- Code extensions: Support for custom nodes and functions
- AI integration: Native support for GPT, Claude, and other AI models
Hugging Face Spaces: AI Application Hosting Platform
- Docker support: Flexible containerized deployment
- Free computing resources: Perfect for small to medium applications
- AI ecosystem access: Easy integration with HF models
- Simple to use: GitHub-like user experience
Supabase: Modern Backend Service
- PostgreSQL database: Full-featured relational database
- Automatic API generation: Support for REST and GraphQL interfaces
- Real-time features: WebSocket support
- Authentication service: Multiple login methods supported
🚀 Deployment Steps
Step 1: Create Supabase Project
-
Sign up and log in to Supabase
-
Create new project
- Click “New Project”
- Select organization
- Project name:
n8n-backend - Set database password (remember it!)
- Choose the nearest region
- Select the free plan
-
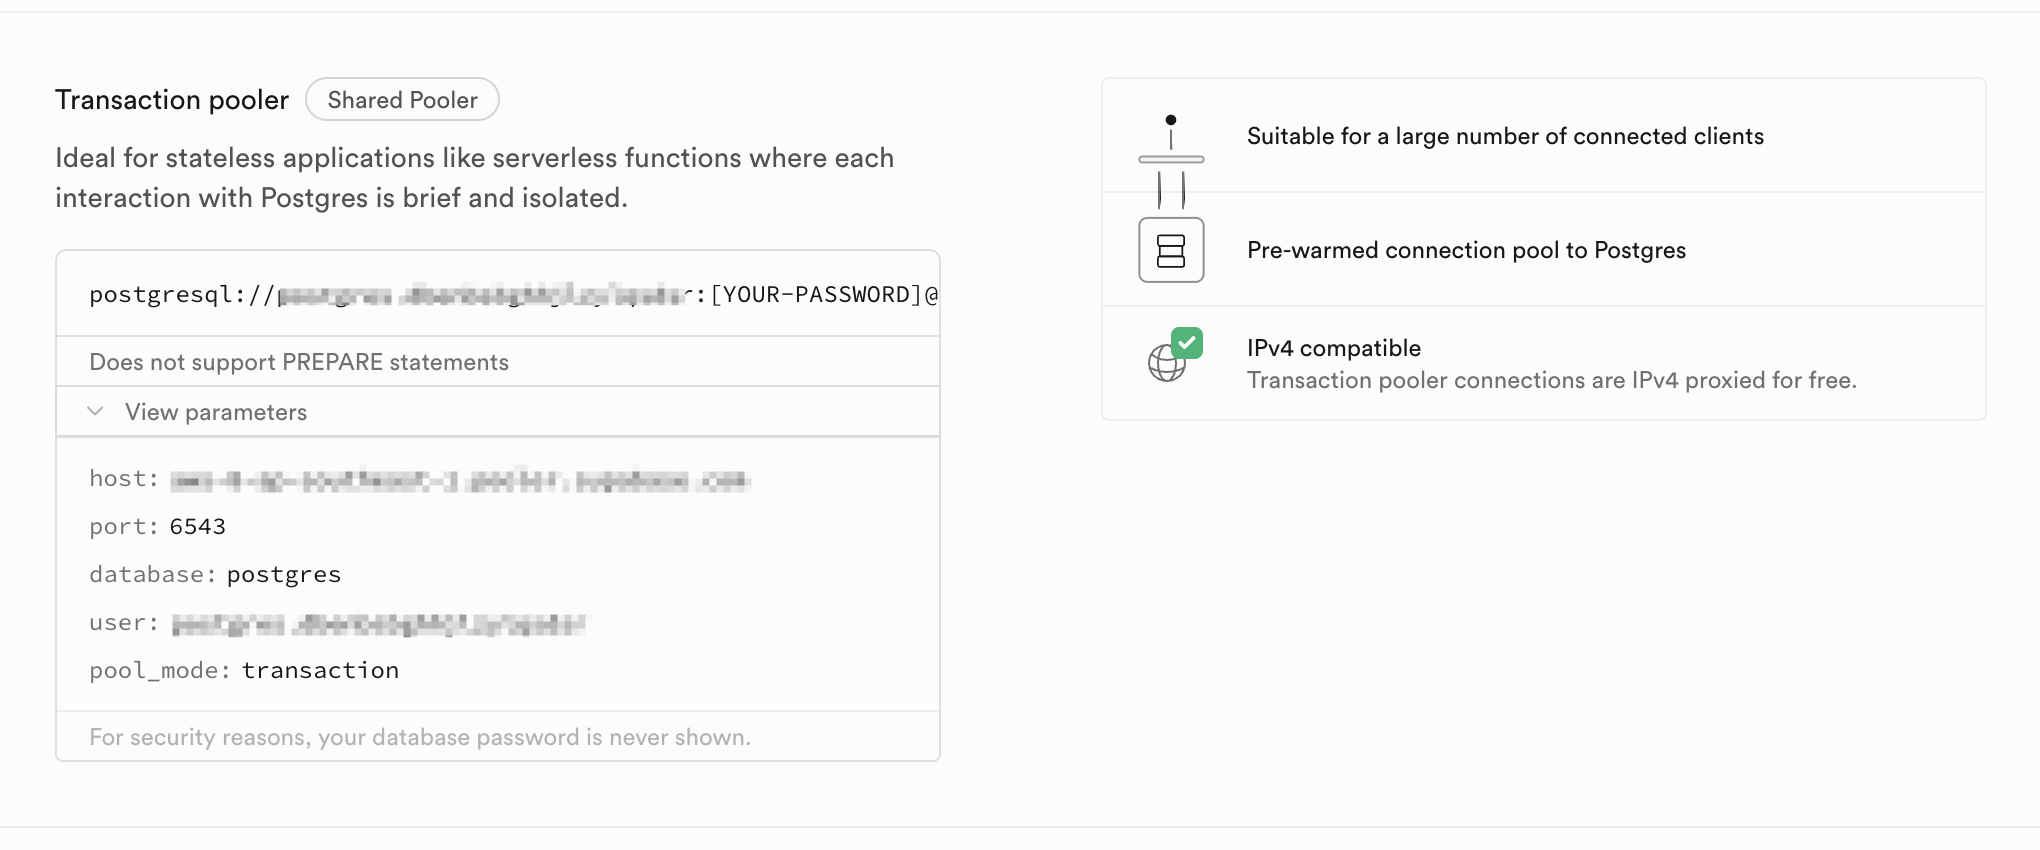
Get connection information
- After project creation, go to “Project Settings”
- Select the “Database” tab
- Record the following connection parameters:
Parameter Description Example Host Database host address db.xxx.supabase.coDatabase Database name postgresUser Username postgresPassword Your set password your_passwordPort Port number 5432
Step 2: Prepare Dockerfile
Create a Dockerfile for n8n:
FROM node:18-alpine

# Set user to root for installation
USER root
# Arguments that can be passed at build time
ARG N8N_PATH=/usr/local/lib/node_modules/n8n
ARG BASE_PATH=/root/.n8n
ARG DATABASE_PATH=$BASE_PATH/database
ARG CONFIG_PATH=$BASE_PATH/config
ARG WORKFLOWS_PATH=$BASE_PATH/workflows
ARG LOGS_PATH=$BASE_PATH/logs
ARG N8N_ENFORCE_SETTINGS_FILE_PERMISSIONS=$N8N_ENFORCE_SETTINGS_FILE_PERMISSIONS
ARG N8N_HOST=$N8N_HOST
ARG N8N_PORT=$N8N_PORT
ARG N8N_PROTOCOL=https
ARG N8N_EDITOR_BASE_URL=$N8N_EDITOR_BASE_URL
ARG WEBHOOK_URL=$WEBHOOK_URL
ARG GENERIC_TIMEZONE=$GENERIC_TIMEZONE
ARG TZ=$TZ
ARG N8N_ENCRYPTION_KEY=$N8N_ENCRYPTION_KEY
ARG DB_TYPE=$DB_TYPE
ARG DB_POSTGRESDB_SCHEMA=$DB_POSTGRESDB_SCHEMA
ARG DB_POSTGRESDB_HOST=$DB_POSTGRESDB_HOST
ARG DB_POSTGRESDB_DATABASE=$DB_POSTGRESDB_DATABASE
ARG DB_POSTGRESDB_PORT=$DB_POSTGRESDB_PORT
ARG DB_POSTGRESDB_USER=$DB_POSTGRESDB_USER
ARG DB_POSTGRESDB_PASSWORD=$DB_POSTGRESDB_PASSWORD

# Install system dependencies
RUN apk add --no-cache \
    git \
    python3 \
    py3-pip \
    make \
    g++ \
    build-base \
    cairo-dev \
    pango-dev \
    chromium \
    postgresql-client \
    ffmpeg \
    yt-dlp

# Set environment variables
ENV PUPPETEER_SKIP_DOWNLOAD=true
ENV PUPPETEER_EXECUTABLE_PATH=/usr/bin/chromium-browser

# Install n8n globally
RUN npm install -g [email protected]

# Create necessary directories
RUN mkdir -p $DATABASE_PATH $CONFIG_PATH $WORKFLOWS_PATH $LOGS_PATH \
    && chmod -R 777 $BASE_PATH

# Set working directory
WORKDIR /data

# Start n8n
CMD ["n8n", "start"]
Important note: Hugging Face Spaces requires applications to listen on port 7860. We configure this through the environment variable
N8N_PORT=7860rather than hardcoding it in the Dockerfile.
Alternatively, you can directly copy someone else’s Hugging Face Space by entering https://huggingface.co/spaces/baoyin2024/n8n-free/blob/main/Dockerfile?duplicate=true in your browser and following the popup prompts to enter relevant configuration information. If you use this method, you can skip step 3 and configure directly according to step 4.
Step 3: Create Hugging Face Space
-
Log in to Hugging Face
-
Create Space
- Click on your avatar → “New Space”
- Space name:
my-n8n-instance - SDK: Select “Docker”
- Visibility: Choose Public as needed
-
Upload Dockerfile
# Clone Space repository
git clone https://huggingface.co/spaces/YOUR_USERNAME/my-n8n-instance
cd my-n8n-instance

# Add Dockerfile
# Copy the previously created Dockerfile to this directory

# Push to repository
git add Dockerfile
git commit -m "Add n8n Dockerfile"
git push
Step 4: Configure Environment Variables
In your Space’s “Settings” → “Repository secrets”, add the following environment variables:
Database Connection Configuration
DB_TYPE=postgresdb
DB_POSTGRESDB_HOST=your-supabase-hostname
DB_POSTGRESDB_USER=postgres
DB_POSTGRESDB_PASSWORD=your-database-password
DB_POSTGRESDB_DATABASE=postgres
DB_POSTGRESDB_PORT=6543
DB_POSTGRESDB_SCHEMA=public
n8n Basic Configuration
N8N_PROTOCOL=https
N8N_EDITOR_BASE_URL=https://username-spacename.hf.space
WEBHOOK_URL=https://username-spacename.hf.space
N8N_ENFORCE_SETTINGS_FILE_PERMISSIONS=true
NOTION_MARKDOWN_CONVERSION=true
N8N_ENCRYPTION_KEY=yourkey
Security Configuration
# Generate encryption key (important!)
N8N_ENCRYPTION_KEY=your-32-character-random-string

# Basic authentication (optional)
N8N_BASIC_AUTH_ACTIVE=true
N8N_BASIC_AUTH_USER=admin
N8N_BASIC_AUTH_PASSWORD=your-admin-password
N8N_USER_MANAGEMENT_DISABLED=true
Other Configuration
WEBHOOK_URL=https://your-username-space-name.hf.space
GENERIC_TIMEZONE=America/New_York
TZ=America/New_York
🔐 Security tip:
N8N_ENCRYPTION_KEYis used to encrypt stored credentials. Please use a strong random string (you can generate one withopenssl rand -hex 32) and keep it safe.
Since we’re using free services, deploying the Docker n8n application requires some time to complete startup, so please be patient.
After successful deployment, you’ll see log output like this:
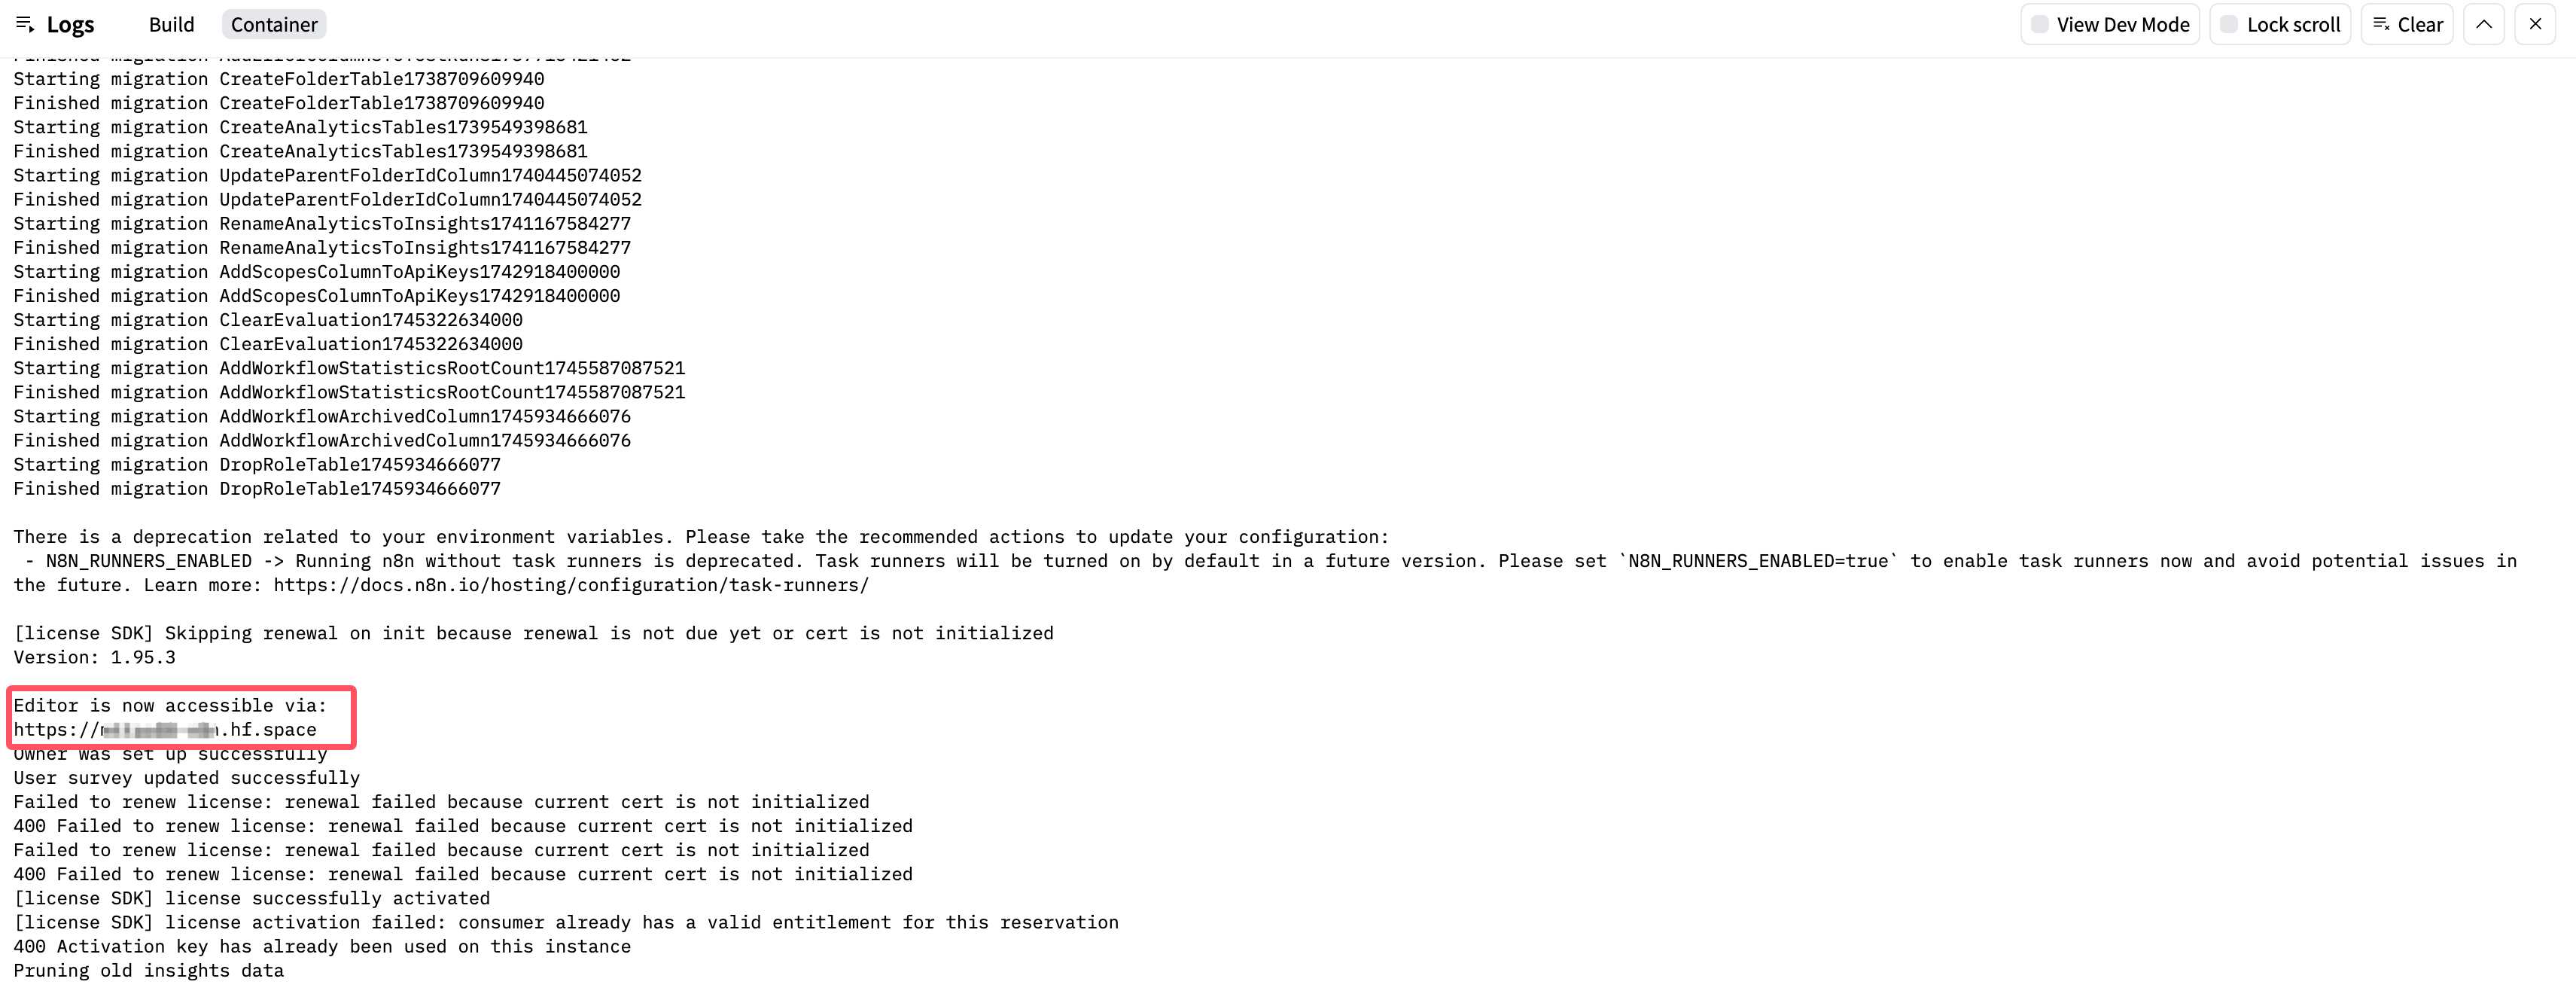
✅ Deployment Verification
Access n8n Interface
After deployment is complete, visit your Space URL:
https://your-username-space-name.hf.space
Initial Configuration
If basic authentication is enabled:
- The browser will show a login dialog
- Enter your configured username and password
If using n8n user management:
- First visit will require creating an admin account
- Set up email, username, and password
Activate Free License
After setup completion, you’ll receive an activation email for n8n. Follow the activation link provided in the email to activate your license.
Feature Testing
-
Create test workflow
- Create new workflow
- Add “Manual Trigger” node
- Add “Set” node to set some data
- Connect nodes and save
-
Execute test
- Manually trigger the workflow
- Check execution results
- Refresh page to confirm data persistence
-
Check logs
- View running logs in the Space’s “Logs” tab
- Ensure no error messages
🔧 Common Issues and Solutions
Connection Issues
Symptom: Cannot access n8n interface
- Check if Space status is “Running”
- Confirm
N8N_PORT=7860is set correctly - Review error information in the Logs tab
Symptom: Database connection failure
- Verify Supabase connection parameters are correct
- Confirm database password is entered correctly
- Check network connectivity and firewall settings
Authentication Issues
Symptom: Cannot log in
- Confirm basic authentication configuration is correct
- Check if username and password match
- Try clearing browser cache
Performance Issues
Symptom: Slow workflow execution
- Optimize workflow logic to reduce complexity
- Consider upgrading to a paid plan
📈 Advanced Optimization
Security Hardening
- Regularly rotate
N8N_ENCRYPTION_KEY - Enable Supabase row-level security policies
- Use strong passwords and two-factor authentication
Performance Optimization
- Design workflows efficiently to reduce resource consumption
- Use n8n’s queue functionality for handling large tasks
- Monitor resource usage
🎉 Conclusion
Through this guide, you’ve successfully built a complete self-hosted n8n platform. The core advantages of this solution include:
- Zero-cost startup: Fully utilize free tiers from various platforms
- Complete autonomy: Data and configuration are entirely under your control
- AI automation: Leverage AI + workflow to complete automated tasks
- Easy maintenance: Modern containerized deployment approach
Now you can start creating your own automation workflows, improve work efficiency, and explore AI-driven automation innovation!
📚 Additional Resources
- n8n Official Documentation
- Hugging Face Spaces Guide
- Supabase Developer Documentation
- n8n Community Forum
Start your automation journey! Feel free to share questions and discuss in the comments.
Mttao GitHub ↗
Exploring technology and life's wisdom